Introduction: The End of the Old Growth Model
For much of the past three decades, China’s economic story was defined by velocity.
Industrialization at historic scale.
Urbanization at unprecedented speed.
Investment-led expansion that reshaped global supply chains.
That phase is complete.
China is not entering decline. But it is exiting the era of rapid catch-up growth and entering something more complex: structural transition.
The period from 2026 to 2030 will not be defined by explosive acceleration or sudden collapse. It will be defined by whether China can stabilize into a mature, mid-single-digit growth economy while rebalancing away from debt-heavy investment toward productivity, technology, and domestic consumption.
Understanding this shift requires moving beyond headlines and focusing on structural forces.
A Larger Economy Means Slower Arithmetic
Growth rates must be interpreted in context.
In the early 2000s, China could grow at 10% annually because its economic base was far smaller. Infrastructure gaps were enormous. Labor supply was expanding. Capital accumulation delivered rapid returns.
Today, China’s economy is approaching the size of the United States in nominal terms and already exceeds it in purchasing-power-adjusted output. At this scale, maintaining double-digit expansion would require output gains larger than entire G20 economies each year — an unrealistic benchmark.
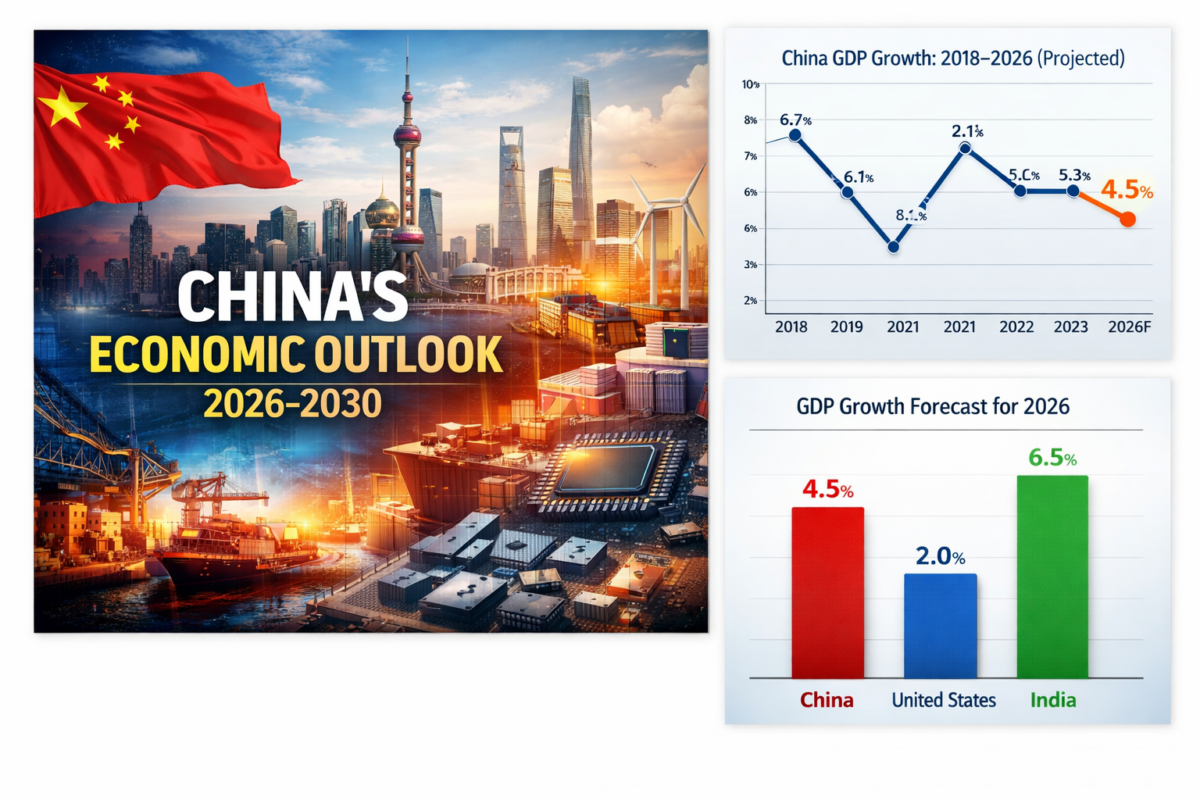
Most institutional forecasts now cluster around 4–5% annual growth in the medium term. That moderation reflects structural normalization, not systemic weakness.
At current scale, even 4.5% growth adds substantial absolute output annually — equivalent to creating an economy the size of a mid-tier European country every year.
Slower percentages no longer imply small impact.
Property: From Engine to Constraint
No single sector illustrates China’s transition more clearly than real estate.
For nearly two decades, property development functioned as an economic multiplier. Construction activity supported steel, cement, glass, household appliances, and local government revenues through land sales. Rising home values reinforced household wealth confidence.
But leverage accumulated. Oversupply expanded in lower-tier cities. Developer balance sheets grew fragile.
The regulatory tightening that began earlier this decade exposed those imbalances. Major developers struggled to refinance. Construction activity slowed. Land sales weakened, pressuring local fiscal systems.
This was not merely cyclical softness. It marked a structural resizing of a sector that had grown beyond sustainable levels.
Real estate is unlikely to regain its previous share of GDP contribution. The policy direction suggests stabilization, not renewed speculation.
For a deeper breakdown of this transformation, see our detailed analysis:
Understanding China’s Property Crisis: Structural Correction, Not Collapse.
Demographics: The Productivity Imperative
China’s demographic profile is shifting decisively.
The working-age population has begun to decline. The median age is rising. Fertility rates remain low despite policy adjustments.
This does not guarantee stagnation. Many advanced economies grow with aging populations. But it changes the mechanics of expansion.
When labor supply stops expanding, growth must come from:
- Productivity gains
- Technological advancement
- Capital efficiency
- Institutional reforms
China’s response has been clear: invest heavily in industrial upgrading and automation.
Whether these investments offset demographic drag will shape the 2026–2030 trajectory.
Industrial Upgrading and Strategic Positioning
China’s policy direction increasingly emphasizes advanced manufacturing and strategic industries.
Electric vehicles.
Battery supply chains.
Renewable energy equipment.
Artificial intelligence and semiconductor capability.
This shift reflects more than economic logic — it reflects geopolitical reality. As trade tensions and export controls increase, China seeks to reduce dependence on foreign technology inputs.
The renewable energy sector provides a useful example. China leads globally in solar manufacturing capacity and renewable installations, positioning itself at the center of the global energy transition. That industrial depth offers long-term strategic leverage.
Industrial upgrading is not a temporary stimulus measure. It is the core of China’s next growth model.
External Environment: Interdependence Under Pressure
China remains deeply integrated into global trade networks. It accounts for a substantial share of global manufacturing exports and is a major importer of raw materials.
However, the external environment has grown more complex.
Supply chain diversification — sometimes framed as “China+1” — reflects corporate risk management rather than complete disengagement. Production is expanding in Southeast Asia and India, but China’s ecosystem depth remains unmatched in many advanced manufacturing segments.
The risk for China is not immediate export collapse. It is gradual erosion of low-margin manufacturing combined with geopolitical friction in high-tech sectors.
This reinforces the urgency of domestic consumption growth.
For analysis on global transmission effects, see:
How China’s Growth Moderation Impacts the Global Economy.
The 2026–2030 Baseline
If current trends persist, the most plausible scenario is steady but moderated growth in the 4–5% range.
This would imply:
- Property stabilizes at lower activity levels
- Industrial upgrading continues
- Consumption gradually strengthens but does not fully replace investment
- Local government debt remains manageable but requires oversight
Such a trajectory would position China as a mature, systemically important economy rather than a high-velocity emerging one.
The greater risk is not slow growth — it is policy miscalibration.
Excessive tightening could deepen domestic weakness.
Excessive stimulus could reignite debt imbalances.
The balance between reform and stability will determine outcomes.
Global Consequences
Even moderated Chinese growth shapes global economics.
Commodity exporters depend on Chinese demand.
Emerging markets link into its supply chains.
Global inflation dynamics respond to its production capacity.
China’s economic transition does not reduce its influence. It changes the form of that influence.
The next five years will reveal whether China can execute a shift from investment intensity to productivity resilience without destabilizing growth.
Conclusion: From Expansion to Consolidation
China’s economic story is entering a consolidation phase.
The era of catch-up acceleration has passed. The new phase requires efficiency, technological depth, and consumption stability.
Mid-single-digit growth, sustained at China’s scale, would still anchor global expansion through the end of the decade.
The central question is not whether China will grow.
It is whether it can transform — without losing momentum.
References
International Monetary Fund (2026). People’s Republic of China: Article IV Consultation Press Release.
https://www.imf.org/en/Publications/CR/Issues
World Bank (2025). China Economic Update.
https://www.worldbank.org/en/country/china/publication
International Energy Agency (2025). Renewables Market Update.
https://www.iea.org/reports


