Categories
Learning Tech

10 Key tips on preparing for ReactJS Interview

Hello,

Lets quickly go through the 10 keys, for preparing for React Js Interview

  1. React basics: Familiarize yourself with React concepts such as components, JSX, state, props, lifecycle methods, hooks, etc.
  2. React-Redux: Understand how to use Redux with React for state management.
  3. React Router: Learn how to handle routing in React applications.
  4. React performance optimization: Know how to optimize the performance of React applications, including techniques like lazy loading, memoization, and using shouldComponentUpdate.
  5. React hooks: Knowledge of React hooks and how they can be used in place of class components.
  6. React testing: Understand how to test React components using tools like Jest and Enzyme.
  7. Familiarity with CSS: Good understanding of CSS, including CSS-in-JS solutions like styled-components.
  8. JavaScript concepts: Good understanding of JavaScript concepts like closure, asynchronous programming, and ES6 syntax.
  9. Git: Knowledge of Git and how to use it for version control.
  10. Problem solving skills: Be prepared to solve algorithmic problems and explain your thought process.

Hope you enjoy learning!

Categories
Learning Tech

Very basic of How to create a React Fiber/React Js Project from scratch

Here is the basic process to create a project with React Fiber:

  1. Install Node.js and npm (Node Package Manager) if you don’t have them installed already.
  2. Use npm to create a new React project by running the following command in your terminal or command prompt:
    npx create-react-app my-app
  3. Navigate to the newly created project directory:
    cd my-app
  4. Start the development server by running:
    npm start
  5. The development server should now be running on http://localhost:3000 in your browser.
  6. You can now start building your React Fiber application by modifying the files in the src directory.
  7. When you’re ready to deploy your application, run the following command to create a production build:
    npm run build

This should give you a basic understanding of how to create a React Fiber project. If you’re new to React, it may be helpful to go through some introductory tutorials before diving into your project.

Happy Learning!

Categories
Downloads & Free Learning Uncategorized

Download Free Bharat (India) Map SVG format

Hello,

Download Bharat (India) Map (SVG format) for Laser Cut or to Print for your school or college projects.

india-bharat-map-for-laser-cut-svg-map
India Full Map SVG Download Free
Categories
Blog Learning Tech

How to update PHP version on shared host website or under cpanel?

Hello welcome to the post!

Look for “MultiPHP Manager” in Cpanel search bar or on home page of your Cpanel after login.

Reference screenshot

It will show you your current System PHP version and below option to change the setting for PHP version as required.

From dropdown menu like on right select the version of PHP you needed and apply, before that not to forget to select the list of domains, if you have multiple websites or subdomains to apply the latest PHP version.

Hope this solves your issue to the fastest when composer dependencies gives error like below when you trying to test small issue of your website.

{ "message": "syntax error, unexpected token \")\"", "exception": "ParseError", "file": "/home4/ininszp2/abclar/vendor/symfony/css-selector/XPath/Extension/NodeExtension.php", "line": 68, "trace": [ { "file": "/home4/ininszp2/abclar/vendor/composer/ClassLoader.php", "line": 428, "function": "Composer\\Autoload\\includeFile" }, { "file": "/home4/ininszp2/abclar/vendor/symfony/css-selector/XPath/Translator.php", "line": 56, "function": "loadClass", "class": "Composer\\Autoload\\ClassLoader", "type": "->" }, { "file": "/home4/ininszp2/abclar/vendor/symfony/css-selector/CssSelectorConverter.php", "line": 40, "function": "__construct", "class": "Symfony\\Component\\CssSelector\\XPath\\Translator", "type": "->" }, { "file": "/home4/ininszp2/abclar/vendor/tijsverkoyen/css-to-inline-styles/src/CssToInlineStyles.php", "line": 19, "function": "__construct", "class": "Symfony\\Component\\CssSelector\\CssSelectorConverter", "type": "->" }, { "file": "/home4/ininszp2/abclar/vendor/laravel/framework/src/Illuminate/Mail/Markdown.php", "line": 73, "function": "__construct", "class": "TijsVerkoyen\\CssToInlineStyles\\CssToInlineStyles", "type": "->" }, { "file": "/home4/ininszp2/abclar/vendor/laravel/framework/src/Illuminate/Mail/Mailable.php", "line": 309, "function": "render", "class":

Thanks for reading and Happy learning!

Categories
Blog Learning Tech

how to fix Referrer Policy: strict-origin-when-cross-origin?

Hello,

I was facing this issue on the subdomain site, were subdomain accessing the assets from parent site domain.abc from folder structure pattern path of image file.

Was getting 404 error for loading image… (why I am explaining all over this, lets come to point of fixing 🙂 )

To note I was doing this under my Cpanel Shared Hosting Server.

In my root folder (mdw) of assets for example mdw/assets/images/ created .htaccess files and added following lines of code:

SetEnvIf Origin "http(s)?://(.+\.)?mywebsite\.com(:\d{1,5})?$" CORS=$0

Header set Access-Control-Allow-Origin "%{CORS}e" env=CORS
Header merge  Vary "Origin"

and the image started loading fine, CORS issue resolved.

Just in regex above replace with the exact domain name of parent it will fix the CORS issue of the question.

Beside, if you don’t have access to shared host or cpanel, then try to install browser CORS plugin and enable it to load the resources by bypassing this CORS issue, in same case it still won’t work you would need request your team or superior to get it resolved for you 🙂

Thanks for reading!

Happy Learning!

Categories
Javascript Learning Tech

What to do when you get Error: sgmail send error Bad Request (400) The attachment content must be base64 encoded. attachments.0.content for nodejs or in next js application?

Okay well, this error occurred when you try to send the generated buffer data as an attachment using @sendgrid/mail service.

To tackle issue, will simply paste the previous line of code and the fix line of code so data was then send as base64 content as required with the @sendgrid/mail service

  res.send(response); //previous line of response from nextjs api

after adding the fix over same above line using Buffer

  res.send(Buffer.from(response).toString('base64')); // to base64 string as an output resolve the above issue

If anyone wants to look for the entire piece of file code, here you go:

// import the necessary node libraries
const chromium = require('chrome-aws-lambda');
const puppeteer = require('puppeteer');
import { createEmailTemplate } from "../../api/functions/index";
// var Buffer = require('buffer/').Buffer  // note: the trailing slash is important!

export default async (req, res) => {

    // console.log({ m: req.method.toLowerCase(), body: Object.keys(req.body).length });

    if (req.method.toLowerCase() !== 'post' ||
        (!Object.keys(req.body).length ||
            process.env.YOUR_EXTERNAL_API_SECRET !== req.body.your_api_secret)) {
        res.status(403).send("Access denied");
        return;
    }

    const { generateType, store } = req.body; // && JSON.parse(JSON.streq.body);
    const templatePayload = {
        ...req.body,
        assetsBaseURL: process.env.NEXT_PUBLIC_ASSETS_BASE_URL,
        siteName: process.env.SITE_NAME,
        logoPath: store?.logo,
    };
    // console.log({ templatePayload });
    try {

        // compile the file with handlebars and inject the customerName variable
        const html = createEmailTemplate("my-invoice", templatePayload);

        // simulate a chrome browser with puppeteer and navigate to a new page
        const browser = await puppeteer.launch({
            args: chromium.args,
            // defaultViewport: chromium.defaultViewport,
            // defaultViewport: generateType && generateType === 'pdf' ? chromium.defaultViewport : { width: 640, height: 1200 }, //chromium.defaultViewport,
            executablePath: await chromium.executablePath,
            headless: generateType && generateType === 'pdf' ? true : chromium.headless,
            ignoreHTTPSErrors: true,
        });

        const page = await browser.newPage();
        await page.setViewport({
            width: 640,
            height: page.viewport().height, // + 400,
            deviceScaleFactor: 1,
        });

        // set our compiled html template as the pages content
        // then waitUntil the network is idle to make sure the content has been loaded
        await page.setContent(html, { waitUntil: 'networkidle0' });

        // convert the page to pdf with the .pdf() method
        let response;
        if (generateType && generateType === 'pdf') {
            const pdf = await page.pdf({ format: 'A4' });
            response = pdf;
        } else {
            const screenshot = await page.screenshot({ fullPage: true });
            response = screenshot;
        }
        await browser.close();

        // // send the result to the client
        res.statusCode = 200;
        res.send(Buffer.from(response).toString('base64'));

        // CODE BELOW WRITE RESPONSE AS HTML AND IMAGE IS DISPLAYED, TESTTED 
        // res.writeHead(200, { 'Content-Type': 'text/html' });
        // res.write('<html><body><img src="data:image/jpeg;base64,')
        // res.write(Buffer.from(response).toString('base64'));
        // res.end('"/></body></html>');

    } catch (err) {
        console.log(err);
        res.status(500).json({ message: err.message });
    }
};

I hope this find useful to anyone who facing this question or challenge.

Happy learning! Enjoy!

Categories
Learning

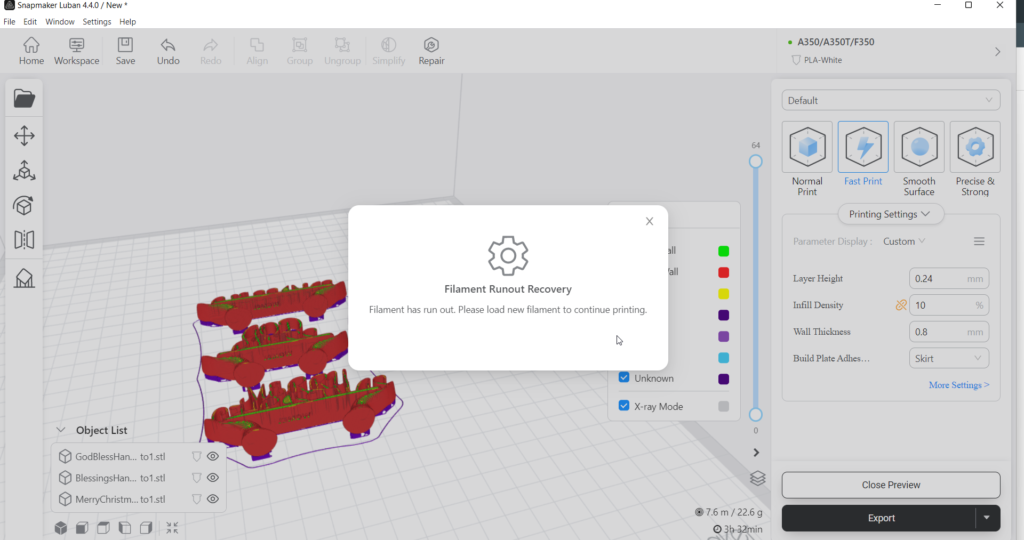
How to remove stuck Filament from Snapmaker A350 3D module or how to fix Filament Runout error message in snapmaker luban or on touch screen?

snapmaker-a350-filament-runout-issue

There is couple of way to fix this questions around ‘or’ ?

First try the way it mention on the snapmaker support page here:

https://support.snapmaker.com/hc/en-us/articles/360060908513-What-should-I-do-if-the-Touchscreens-keeps-showing-Filament-Runout-

which could solve the issue of the error message of Filament runout.

Incase that’s not your case, then you need to pull out the jammed filament in the filament passer to the nozzle.

Here is the quick answer in the video how to get that jammed filament out more easily and what not required to do (so). Please follow the video how exactly it got fixed for the me for the stuck filament not coming out.

Fix filament stuck issue in Snapmaker 3D Module #snapmaker @3dmodule #filament

After removing the stuck filament, I was still getting filament runout error, I was sure I have missed the steps of tightening the filament runout sensor in the module, so I have used following command line code to skip the check of Filament Runout Error and proceed with the new 3D Prints:

To Disabled Filament Runout check, type code in Command Line Interface in Luban Software: M412 S0
To enable Filament Runout check, type code in Command Line Interface in Luban Software: M412 S1

Hope this solves your issue and happy 3D printing.

Thanks for visiting and have a beautiful time. 🙂

Categories
Learning

Looking for Frontend Developer Remote/Mumbai

Hello,

If you are looking for frontend consultant or full time Sr Frontend lead/developer and your paying have no limit

You can reach out jb@doableyo.com, he is available currently to be hired as permanent fulltime position or if you would like to be partnered with him.

He have worked on complex SPA projects using ReactJs, Angular, NextJs, HTML5, jQuery, CSS3 for fortune 500 MNC companies in India or at Global level.

Thank you

#india #frontend #hireme #developer #fulltime #jobs #recruiter #team #individual #trustful

Categories
Learning

Why one will face danger and why one will not?

Hello,

from the below video post/reel, Bhai ji explaining when one will face danger and why one not if he his real Spritual Guru or motivational speaker.

Because, when one will not face danger or faced danger, he will have not touch the real issues of India who all have holding the India from within by using masked face of religion, politicians and what not.

https://www.instagram.com/reel/Cep3O2ylKEt/?igshid=YmMyMTA2M2Y=

Categories
Blog Javascript Learning

Easy steps to create source endpoints with base url’s in react or any spa applications using ES6 tagged templates as a project utility and maintainbilty

Hello,

Here I would like to share with you a very handy and new innovative approach using ES6 Tag Literals template to ease of creating the base URL’s for use a single source of truth defined as library constants or utility code to refer as the single page application grows.

Let’s get hand dirty and mind free from hassle of maintaining and forming lines cluttered code and creating mess in many files as web application grows.

Hope you understand what I mean, developers get frustrated to follow the best practice as in tight project deadlines,

Heads up on I am currently using 2Factor.in endpoints in this post as I were using part of the project implementation, we will head in list out numbers as steps needs to follow for the quick implementation:

  1. We will save API key and API base URL in env file, (hope you are aware were it will lies in your project code, basically it lies at the core level of project director with named and with extension exactly, .env
SITE_2FACTORIN_API_BASE_URL=https://2factor.in/API/V1/
SITE_2FACTORIN_API_KEY=XXXXXX-dde0-23ec-XXXXXXXXXX

2. As I were using Nextjs, so I need to configure these env variables in next.config.js file to export it to the FE side contants(.js) file:

//next.config.js
module.exports = {
  publicRuntimeConfig: {
    SITE_2FACTORIN_API_BASE_URL: process.env.SITE_2FACTORIN_API_BASE_URL,
    SITE_2FACTORIN_API_KEY: process.env.SITE_2FACTORIN_API_KEY,
  },
};

3. Next we need to import publicRuntimeConfig object in our constants(.js) file

import { publicRuntimeConfig } from "./env.settings";

I am importing from .env.settings files which is actually using nextjs getConfig method to export publicRuntimeConfig variable, I am skipping that step to show here, once you search for docs on next/config you will get an idea what we are doing here.

4. Main part here it comes in contants.js file:

export const f2param1 = (param) => param || 1234657890;
export const f2param2 = (param) => param || "myTemplateName-OTP";

export function tagTemplate2FactorAPI(strings, param1, param2) {

  const { SITE_2FACTORIN_API_BASE_URL, SITE_2FACTORIN_API_KEY } = publicRuntimeConfig;
  const prefixBaseUrl = SITE_2FACTORIN_API_BASE_URL + SITE_2FACTORIN_API_KEY + '/';

  let str0 = strings[0] || ""; // "That "
  let str1 = strings[1] || ""; // " is a "
  let str2 = strings[2] || ""; // "."

  // We can even return a string built using a template literal
  return `${prefixBaseUrl}${str0}${param1 || ''}${str1}${param2 || ''}${str2}`;
}

export const factor2API_Endpoint = {
  CHECK_OTP_SMS_BALANCE: `BAL/SMS`,
  SEND_OTP_SMS: tagTemplate2FactorAPI`SMS/${f2param1()}/AUTOGEN`,
  SEND_OTP_SMS_TEMPLATE: tagTemplate2FactorAPI`SMS/${f2param1()}/AUTOGEN/${f2param2()}`,
  SEND_VERIFY_SMS: tagTemplate2FactorAPI`SMS/VERIFY/${f2param1()}/${f2param2()}`,
  CHECK_TRANS_SMS_BALANCE: `/ADDON_SERVICES/BAL/TRANSACTIONAL_SMS`,
  SEND_TRANS_SMS: `/ADDON_SERVICES/SEND/TSMS`,
  SEND_TRANS_SMS_DYNAMIC_TEMPLATE: `/ADDON_SERVICES/SEND/TSMS`,
};

console.log(factor2API_Endpoint.SEND_OTP_SMS);
console.log(factor2API_Endpoint.SEND_OTP_SMS_TEMPLATE);
console.log(factor2API_Endpoint.SEND_VERIFY_SMS);

This is how the final code looks, but there is a catch in this code, just need to handle of passing the params dynamically to the constants property of the object, otherwise with the fixed 2 params in same file would do the trick.

Will share once I got the way of passing dynamic params values to object property in template literal invocation line.

—— Here I found it the other approach —- Edited: 00:44 (after few mins of publishing this post after above approach shared 🙂 )

export function tagTemplate2FactorAPI(strings, ...keys) {

  const { SITE_2FACTORIN_API_BASE_URL, SITE_2FACTORIN_API_KEY } = publicRuntimeConfig;
  const prefixBaseUrl = SITE_2FACTORIN_API_BASE_URL + SITE_2FACTORIN_API_KEY + '/';

  return (function (...values) {
    let dict = values[values.length - 1] || {};
    let result = [strings[0]];
    keys.forEach(function (key, i) {
      let value = Number.isInteger(key) ? values[key] : dict[key];
      result.push(value, strings[i + 1]);
    });

    result.unshift(prefixBaseUrl); //added this line to prefix with base url path
    return result.join('');
  });
}

export const factor2API_Endpoint = {
  CHECK_OTP_SMS_BALANCE: `BAL/SMS`,
  SEND_OTP_SMS: tagTemplate2FactorAPI`SMS/${0}/AUTOGEN`,
  SEND_OTP_SMS_TEMPLATE: tagTemplate2FactorAPI`SMS/${0}/AUTOGEN/${1}`,
  SEND_VERIFY_SMS: tagTemplate2FactorAPI`SMS/VERIFY/${0}/${1}`,
  CHECK_TRANS_SMS_BALANCE: `/ADDON_SERVICES/BAL/TRANSACTIONAL_SMS`,
  SEND_TRANS_SMS: `/ADDON_SERVICES/SEND/TSMS`,
  SEND_TRANS_SMS_DYNAMIC_TEMPLATE: `/ADDON_SERVICES/SEND/TSMS`,
};

 console.log(factor2API_Endpoint.SEND_OTP_SMS(12311312, 'newTemplate-newOTP'));
 console.log(factor2API_Endpoint.SEND_OTP_SMS_TEMPLATE(5656565, 'newTemplate-newOTP'));
 console.log(factor2API_Endpoint.SEND_VERIFY_SMS(456646545, 'newTemplate-newOTP'));

Output log of the above code:

Solution, I found right after reading the basic guide on Tagged template on Mozilla documentation on Tagged Templates

Thanks for reading.

Happy Learning.