Categories
Javascript Tech

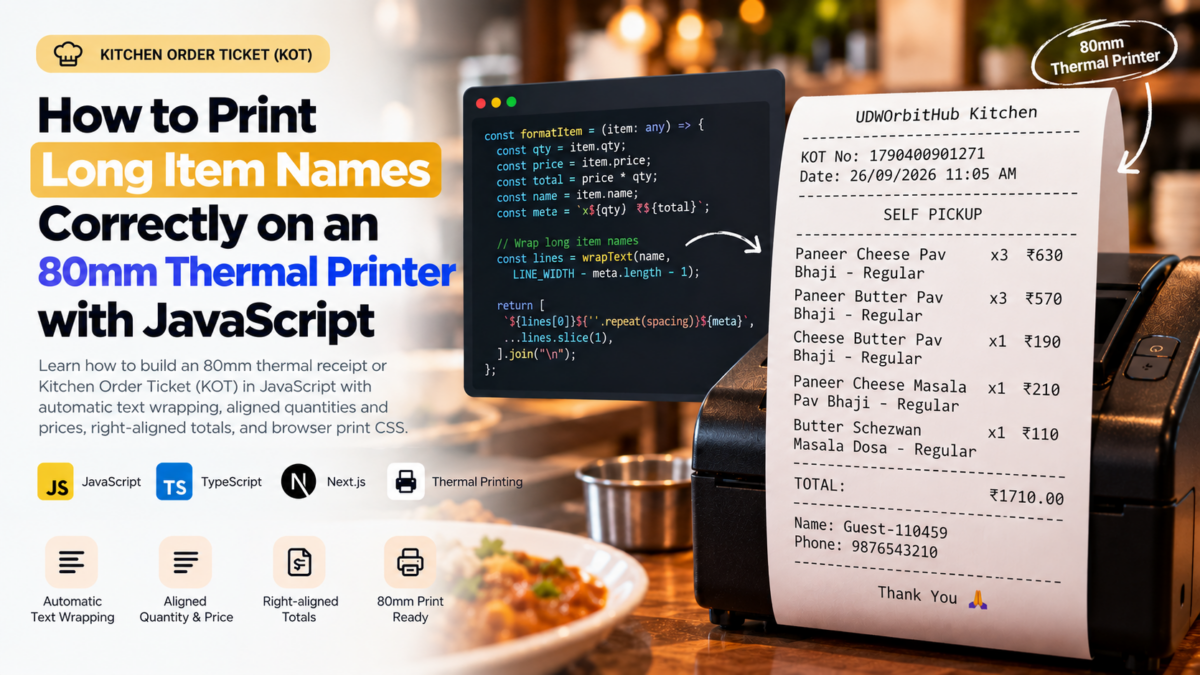
How to Print Long Item Names Correctly on an 80mm Thermal Printer with JavaScript

Printing receipts from a web application looks simple until you encounter a menu item with a long name.

A short item may print perfectly:

Butter Pav Bhaji       x1 ₹150

But a longer item can easily break an 80mm thermal receipt:

Paneer Cheese Pav Bhaji - Regular x1 ₹210

The quantity or price may move outside the printable area, text may be clipped, or the printer may wrap the line at an unexpected position.

I encountered this while generating a Kitchen Order Ticket (KOT) using JavaScript and browser printing.

The solution was not to reduce the font size or truncate menu item names.

Instead, I created a small fixed-width text formatter that:

  • wraps long item names automatically
  • avoids cutting words where possible
  • keeps quantity and price visible
  • keeps the total amount right-aligned
  • supports preparation options and notes
  • prints consistently on an 80mm thermal printer

Here’s how it works.


The Original Problem

The initial formatter was straightforward:

const LINE_WIDTH = 32;

const formatItem = (item: any) => {
    const total = item.price * item.qty;

    const left = `${item.name} x${item.qty}`;
    const right = `₹${total}`;

    const spacing =
        LINE_WIDTH - left.length - right.length;

    return (
        left +
        " ".repeat(Math.max(1, spacing)) +
        right
    );
};

For short menu items, this works well:

Butter Pav Bhaji       x1 ₹150

The formatter calculates the space between the item description and price and inserts enough spaces to align the amount.

The problem starts when the item name becomes longer than the available width.

For example:

Paneer Cheese Pav Bhaji - Regular x1 ₹210

There is no longer enough space for the item name, quantity, and price on the same line.

The calculation:

LINE_WIDTH - left.length - right.length

becomes negative.

Using:

Math.max(1, spacing)

prevents an invalid number of spaces, but it doesn’t solve the real problem: the text itself is too long for the receipt.


Why 80mm Thermal Printing Needs Special Handling

An 80mm paper roll does not necessarily provide 80mm of usable text space.

The actual printable area depends on several factors:

  • printer hardware margins
  • printer driver settings
  • browser print scaling
  • CSS padding
  • font family
  • font size
  • operating system print settings

For plain-text thermal printing, using a monospace font with a predictable character width makes formatting much easier.

In this example, I use:

const LINE_WIDTH = 32;

Thirty-two characters is deliberately conservative.

Some 80mm printers can fit more characters per line, but using a slightly smaller width makes the receipt more reliable across different printers and browser print configurations.


Step 1: Create Basic Receipt Helpers

First, define the receipt width and helpers for separators and centered text.

const LINE_WIDTH = 32;

const line = () => "-".repeat(LINE_WIDTH);

const center = (text: string) => {
    if (!text) return "";

    const space = Math.max(
        0,
        Math.floor(
            (LINE_WIDTH - text.length) / 2
        )
    );

    return " ".repeat(space) + text;
};

Now:

line();

produces:

--------------------------------

And:

center("SELF PICKUP");

produces approximately:

          SELF PICKUP

Because a monospace font is used later, each space has a predictable width.


Step 2: Create a Reusable Text-Wrapping Function

Next, we need a utility that can wrap long strings without cutting normal words in the middle.

const wrapText = (
    text: string,
    width: number
): string[] => {
    if (!text) return [];

    const words = text
        .trim()
        .split(/\s+/);

    const lines: string[] = [];

    let current = "";

    words.forEach((word) => {
        /*
         * Handle an individual word that is
         * longer than the entire available width.
         */
        if (word.length > width) {
            if (current) {
                lines.push(current);
                current = "";
            }

            for (
                let i = 0;
                i < word.length;
                i += width
            ) {
                lines.push(
                    word.slice(i, i + width)
                );
            }

            return;
        }

        const next = current
            ? `${current} ${word}`
            : word;

        if (next.length <= width) {
            current = next;
        } else {
            if (current) {
                lines.push(current);
            }

            current = word;
        }
    });

    if (current) {
        lines.push(current);
    }

    return lines;
};

For example:

wrapText(
    "Paneer Cheese Masala Pav Bhaji Regular",
    20
);

can produce:

Paneer Cheese Masala
Pav Bhaji Regular

Instead of:

Paneer Cheese Masala P
av Bhaji Regular

This makes printed receipts significantly easier to read.


Step 3: Format the Item While Reserving Space for Quantity and Price

The important part is that the item description should be flexible, while the quantity and price should remain readable.

For example, we want:

Paneer Cheese Pav    x3 ₹630
Bhaji

rather than:

Paneer Cheese Pav Bhaji x3 ₹
630

We can accomplish this by calculating how much space the metadata requires first.

const formatItem = (item: any) => {
    const qty = Number(
        item.qty || 0
    );

    const price = Number(
        item.price || 0
    );

    const total = price * qty;

    const name = String(
        item.name || ""
    ).trim();

    const meta = `x${qty} ₹${total}`;

    /*
     * Reserve enough room on the first
     * line for quantity and price.
     */
    const availableWidth = Math.max(
        10,
        LINE_WIDTH - meta.length - 1
    );

    const words = name.split(/\s+/);

    let firstLine = "";

    const remainingWords: string[] = [];

    for (
        let index = 0;
        index < words.length;
        index++
    ) {
        const word = words[index];

        const candidate = firstLine
            ? `${firstLine} ${word}`
            : word;

        if (
            candidate.length <=
            availableWidth
        ) {
            firstLine = candidate;
        } else {
            remainingWords.push(
                ...words.slice(index)
            );

            break;
        }
    }

    /*
     * Handle an unusually long first word.
     */
    if (
        !firstLine &&
        remainingWords.length
    ) {
        const word =
            remainingWords.shift()!;

        firstLine = word.slice(
            0,
            availableWidth
        );

        if (
            word.length >
            availableWidth
        ) {
            remainingWords.unshift(
                word.slice(
                    availableWidth
                )
            );
        }
    }

    /*
     * Calculate spacing between the item
     * description and quantity/price.
     */
    const spacing = Math.max(
        1,
        LINE_WIDTH -
            firstLine.length -
            meta.length
    );

    const output = [
        `${firstLine}${" ".repeat(
            spacing
        )}${meta}`,
    ];

    /*
     * Remaining item description can use
     * the entire width of subsequent lines.
     */
    if (remainingWords.length) {
        output.push(
            ...wrapText(
                remainingWords.join(" "),
                LINE_WIDTH
            )
        );
    }

    return output.join("\n");
};

Now long item names wrap without pushing the price outside the receipt.

For example:

Paneer Cheese Pav    x3 ₹630
Bhaji

Another item might produce:

Paneer Cheese Masala x1 ₹210
Pav Bhaji - Regular

And an even longer item remains safe:

Paneer Tikka Butter  x2 ₹640
Masala Special Family Size
with Extra Cheese

Step 4: Support Preparation Options and Notes

Kitchen tickets often contain more than the product name.

For example:

Paneer Butter Pav    x1 ₹190
Bhaji
  No Onion, Less Oil
  Note: Extra spicy

You can build the items section like this:

const itemsBlock = cart
    .map((item: any) =>
        [
            formatItem(item),

            item.prepOptions?.length
                ? "  " +
                  item.prepOptions.join(", ")
                : "",

            item.note
                ? "  Note: " + item.note
                : "",
        ]
            .filter(Boolean)
            .join("\n")
    )
    .join("\n");

This keeps additional kitchen instructions underneath their corresponding item.


Step 5: Right-Align the Total Amount

The same fixed-width technique can also create a cleaner total row.

Instead of:

TOTAL: ₹1710.00

we can print:

TOTAL:                  ₹1710.00

Create another formatter:

const formatTotal = (
    total: number | string
) => {
    const left = "TOTAL:";
    const right = `₹${total}`;

    const spacing = Math.max(
        1,
        LINE_WIDTH -
            left.length -
            right.length
    );

    return (
        left +
        " ".repeat(spacing) +
        right
    );
};

Then use:

formatTotal(total);

The result is:

--------------------------------
TOTAL:                  ₹1710.00
--------------------------------

This makes totals much easier to identify on a printed receipt.


Step 6: Build the Complete KOT

Here is a simplified version of the receipt builder.

This example uses dayjs for the timestamp.

View Complete Source Code section below in this page.


Step 7: Configure Browser Printing for 80mm Paper

Formatting the text correctly is only half of the solution.

The browser also needs to know that the output is intended for an 80mm thermal printer.

First, create a small HTML escape function.

const escapeHtml = (
    value: string
) => {
    return value
        .replace(/&/g, "&amp;")
        .replace(/</g, "&lt;")
        .replace(/>/g, "&gt;")
        .replace(/"/g, "&quot;")
        .replace(/'/g, "&#039;");
};

Escaping the receipt is important because item names, customer information, notes, and other values may contain characters that would otherwise be interpreted as HTML.

Then create the print function:

export const printReceipt = (
    text: string
) => {
    const printWindow =
        window.open("", "_blank");

    if (!printWindow) return;

    printWindow.document.write(`
        <!DOCTYPE html>

        <html>
            <head>
                <title>KOT</title>

                <style>
                    @page {
                        size: 80mm auto;
                        margin: 0;
                    }

                    * {
                        box-sizing: border-box;
                    }

                    html,
                    body {
                        margin: 0;
                        padding: 0;
                        width: 80mm;
                        background: #fff;
                    }

                    pre {
                        margin: 0;
                        padding: 4mm 3mm;
                        width: 80mm;

                        font-family:
                            "Courier New",
                            Courier,
                            monospace;

                        font-size: 12px;
                        line-height: 1.35;

                        white-space: pre-wrap;
                        overflow-wrap: break-word;

                        color: #000;
                    }

                    @media print {
                        html,
                        body {
                            width: 80mm;
                        }

                        pre {
                            width: 80mm;
                        }
                    }
                </style>
            </head>

            <body>
                <pre>${escapeHtml(text)}</pre>
            </body>
        </html>
    `);

    printWindow.document.close();

    printWindow.focus();

    setTimeout(() => {
        printWindow.print();
    }, 100);
};

The important CSS is:

@page {
    size: 80mm auto;
    margin: 0;
}

combined with:

font-family:
    "Courier New",
    Courier,
    monospace;

A monospace font is particularly important because the JavaScript formatter relies on characters having approximately equal visual widths.


Printing the KOT

Once the formatter and print function are ready, printing becomes straightforward:

const handlePrint = () => {
    if (!cart?.length) return;

    const text =
        buildThermalPrint({
            cart,
            customer,
            orderType,
            store,
            receiptNo,
        });

    printReceipt(text);
};

You can then connect it to a button:

<button
    type="button"
    onClick={handlePrint}
>
    Print KOT
</button>

Final Output

The resulting KOT can look like this:

         MY STORE Kitchen
--------------------------------
KOT No: 1790400901271
Date: 26/09/2026 11:05 AM
--------------------------------
          SELF PICKUP
--------------------------------
Paneer Cheese Pav    x3 ₹630
Bhaji - Regular

Paneer Butter Pav    x3 ₹570
Bhaji - Regular

Cheese Butter Pav    x1 ₹190
Bhaji - Regular

Paneer Cheese Masala x1 ₹210
Pav Bhaji - Regular

Butter Schezwan      x1 ₹110
Masala Dosa - Regular
--------------------------------
TOTAL:                  ₹1710.00
--------------------------------
Name: Guest Customer
Phone: 9876543210
--------------------------------
           Thank You

Long menu item names no longer push the quantity or price outside the receipt width.

The receipt also remains plain text, which makes it lightweight and suitable for thermal printing.


Why Not Just Use CSS word-wrap?

You could allow the browser to automatically wrap everything:

white-space: pre-wrap;
overflow-wrap: break-word;

But that alone doesn’t understand the structure of a receipt.

The browser might produce something like:

Paneer Cheese Pav Bhaji - Regular x3
₹630

or:

Paneer Cheese Pav Bhaji -
Regular x3 ₹630

That may technically fit, but it gives you less control over the kitchen ticket layout.

By formatting the text before printing, we explicitly tell the receipt:

  1. how wide a line can be
  2. where the item description should wrap
  3. where quantity should appear
  4. where price should appear
  5. how totals should align

CSS then handles the physical 80mm page.

The two approaches work together.


Why Use Plain Text Instead of an HTML Table?

HTML tables and CSS Grid can also produce excellent receipts.

However, plain-text formatting has some useful properties for thermal printing:

  • simple output
  • predictable layout
  • easy debugging
  • minimal CSS
  • easy copying and logging
  • works naturally with monospace printers
  • straightforward alignment

For more sophisticated receipts containing logos, multiple columns, QR codes, taxes, discounts, or complex invoice structures, an HTML-based layout may be preferable.

For a KOT, however, fixed-width text can be an effective solution.


Important: Character Width Is Not Physical Width

One thing to keep in mind is that:

const LINE_WIDTH = 32;

does not mean every 80mm printer can only print 32 characters.

Depending on the printer, font, DPI, and driver configuration, you may be able to use:

32
40
42

or even:

48

characters per line.

Start conservatively and test with the actual thermal printer.

For example:

const LINE_WIDTH = 32;

is safer than increasing the width until the text is almost touching both edges of the paper.

A small amount of unused horizontal space is usually preferable to clipped kitchen tickets.


Browser Printing Has Limitations

This implementation uses:

window.print();

That means the browser and operating system still control the final print process.

Depending on the environment, users may still need to select:

  • the correct thermal printer
  • 80mm paper size
  • appropriate margins
  • 100% print scale
  • header/footer disabled

For a web-based POS or restaurant ordering system, this approach works well when manual browser printing is acceptable.

If completely silent printing is required, a dedicated local printing solution or printer integration may eventually be necessary.


Final Thoughts

The key lesson is that thermal receipt formatting should not depend entirely on the browser deciding where text should wrap.

For a predictable 80mm KOT:

  1. use a monospace font
  2. define a maximum character width
  3. reserve space for quantity and price
  4. wrap long item names yourself
  5. right-align important numeric values
  6. explicitly configure the 80mm print page
  7. test against the physical printer

Instead of shrinking fonts or truncating menu item names, this approach lets the content naturally expand vertically while keeping the receipt width predictable.

That is usually exactly what you want from a thermal Kitchen Order Ticket.


Complete Source Code

The complete TypeScript implementation is available here:

View the 80mm Thermal KOT Printing Code → Coming soon this page.


Frequently Asked Questions

What line width should I use for an 80mm thermal printer?

There is no universal character count because it depends on the printer, font size, driver, and margins.

A value such as:

const LINE_WIDTH = 32;

is a conservative starting point.

Test the result using the actual printer before increasing it.

Why should I use a monospace font?

The formatter aligns content by counting characters and inserting spaces.

With a proportional font, characters have different visual widths, so:

TOTAL:                  ₹1710.00

may not align correctly.

A monospace font gives every character approximately the same width.

Can this work with a 58mm thermal printer?

Yes.

The same formatter can be used, but LINE_WIDTH, font size, and CSS width should be adjusted for the smaller paper size.

For example, you might start with a smaller line width and:

@page {
    size: 58mm auto;
}

The exact configuration should be tested against the target printer.

Can I print preparation options and kitchen notes?

Yes.

Because additional information is printed underneath the item, modifiers fit naturally:

Paneer Butter Pav    x1 ₹190
Bhaji
  No Onion, Less Oil
  Note: Extra spicy

This makes the same approach particularly useful for restaurant KOT printing.

Should I truncate long menu item names?

Usually, no.

For kitchen tickets, the full item name can be operationally important.

Allowing the description to wrap onto another line is generally safer than hiding part of the item name just to maintain a single-line layout.


If you’re building a restaurant POS, ordering application, or any web application that needs thermal printing, this fixed-width formatting approach provides a simple foundation that can later be extended for taxes, discounts, order numbers, QR codes, modifiers, and other receipt information.

Categories
AI & Technology Javascript Programming Technology, Web Development World in Motion

🚀 JavaScript Evolution: From Browser Scripting to Universal Runtime (2026 Deep Dive)

🧠 Introduction

JavaScript is no longer just a browser scripting language—it is now the backbone of modern software development. From powering interactive web pages in the 1990s to running full-scale distributed systems, JavaScript has evolved into a universal runtime shaping how applications are built and deployed.

In this deep dive, we explore:

  • How JavaScript has transformed over time
  • What major features and paradigms were introduced
  • How its ecosystem reshaped development
  • Where JavaScript is heading in the next decade

But beyond just evolution, JavaScript has fundamentally shifted its role in the tech ecosystem. It didn’t just grow—it repositioned itself as a universal runtime across platforms.
👉 Read deeper insight: JavaScript Didn’t Just Evolve — It Repositioned Itself


🕰️ Phase 1: The Early Days (1995–2005)

JavaScript was created in 1995 with a simple goal:
👉 Make web pages interactive.

Key Characteristics

  • Loosely typed
  • Prototype-based inheritance
  • Event-driven execution
  • Minimal tooling

Limitations

  • No modular architecture
  • Browser inconsistencies
  • Callback-heavy async patterns

At this stage, JavaScript was often underestimated and considered unreliable for serious engineering.


⚙️ Phase 2: Standardization with ES5 (2009)

The release of ECMAScript 5 brought stability and structure.

What Changed

  • Strict mode ("use strict")
  • Native JSON support
  • Functional array methods (map, filter, reduce)
  • Better object control

Why It Mattered

This era laid the foundation for scalable JavaScript applications and enabled cleaner, more predictable codebases.


🔥 Phase 3: ES6 – The Turning Point (2015)

ES6 was not just an update—it was a complete transformation.

This transformation marked the beginning of a deeper shift—not just in syntax, but in how JavaScript positioned itself in the software world.
👉 Explore the full perspective here: JavaScript Didn’t Just Evolve — It Repositioned Itself

Major Features Introduced

Block Scoping

let count = 0;
const MAX = 10;

Arrow Functions

const sum = (a, b) => a + b;

Classes (Cleaner OOP)

class User {
constructor(name) {
this.name = name;
}
}

Modules (Finally!)

export const api = {};
import { api } from './file.js';

Promises

fetch(url).then(res => res.json());

Destructuring

const { name } = user;

🚀 Impact of ES6

  • Enabled large-scale applications
  • Improved readability and maintainability
  • Shifted JavaScript toward modern engineering standards

🌍 JavaScript Beyond the Browser

⚡ Node.js Revolution

JavaScript expanded to the backend, enabling:

  • Server-side development
  • APIs and microservices
  • Real-time applications

👉 One language, full stack.

This moment defined JavaScript’s identity shift—from a frontend scripting tool to a cross-platform runtime environment.
👉 Detailed breakdown: JavaScript Didn’t Just Evolve — It Repositioned Itself


🎨 Frontend Framework Shift

Development moved from manual DOM handling to structured UI systems:

  • React → Component-driven architecture
  • Angular → Full ecosystem
  • Vue → Reactive simplicity

This introduced:

Declarative UI + state-driven design


⏳ Async Evolution: The Biggest Developer Pain Solved

Before (Callback Hell)

fs.readFile(file, (err, data) => {});

Promises

readFile(file).then(data => {});

Async/Await (Modern Standard)

async function load() {
const data = await readFile(file);
}

Result

  • Cleaner logic
  • Better debugging
  • Synchronous-like flow

🧩 TypeScript Influence (The Silent Takeover)

JavaScript itself didn’t become typed—but the ecosystem did.

Why TypeScript Won

  • Large app complexity
  • Need for type safety
  • Better tooling

Real Impact

  • Enterprise-level adoption
  • Reduced runtime errors
  • Strong IDE support

Today:

TypeScript is often the default, not optional.


⚡ Modern JavaScript (ES2018–2026)

JavaScript now evolves every year with incremental improvements.

Key Modern Features

Optional Chaining

user?.profile?.name

Nullish Coalescing

value ?? "default"

Top-Level Await

const data = await fetch(url);

Logical Assignment

x ||= 10;

BigInt

const big = 999999999999999999n;

🧠 The Real Power: JavaScript Ecosystem

The language is only part of the story.

Tooling Explosion

  • Bundlers: Webpack, Vite
  • Transpilers: Babel
  • Linters: ESLint
  • Formatters: Prettier

Runtime Expansion

  • Browser
  • Node.js
  • Deno
  • Bun

Cross-Platform Reach

  • Mobile → React Native
  • Desktop → Electron
  • Cloud → Serverless functions

🔄 Paradigm Shift Summary

AreaOld JavaScriptModern JavaScript
Code StructureScriptsModules
AsyncCallbacksAsync/Await
UIManual DOMComponent-based
RuntimeBrowser onlyEverywhere
TypingDynamicTyped (TS)

🔮 Where JavaScript Is Heading

1. Edge Computing

JavaScript is moving closer to users:

  • Faster response times
  • Distributed execution

2. WebAssembly Integration

JavaScript will act as a bridge for high-performance code:

  • Gaming
  • AI
  • Video processing

3. Type-Safe Future

  • TypeScript dominance
  • Possible native type support

4. AI + JavaScript

JavaScript is becoming the interface layer for AI systems:

  • Browser AI apps
  • Node.js AI orchestration
  • AI SDK ecosystems
This reinforces a critical idea: JavaScript isn’t just evolving—it’s strategically positioning itself at the center of modern computing.  
👉 Read the deeper analysis: JavaScript Didn’t Just Evolve — It Repositioned Itself

5. New Runtimes

Emerging tools like Bun and Deno are pushing:

  • Faster execution
  • Better developer experience

⚠️ Challenges Ahead

1. Ecosystem Overload

Too many tools, too many choices.

2. Complexity

Modern JS requires:

  • Build systems
  • Configurations
  • Dependency management

3. Backward Compatibility

JavaScript cannot break existing web apps—limiting radical changes.


🏁 Final Thoughts

JavaScript’s evolution is not just technical—it’s philosophical.

It has transformed into:

A universal language that connects frontend, backend, mobile, cloud, and AI systems.

The future of JavaScript is not about replacing it—but expanding it further into every layer of computing.

🔗 Recommended Deep Read

If you want to truly understand the strategic shift behind JavaScript’s dominance, don’t miss this:

👉 JavaScript Didn’t Just Evolve — It Repositioned Itself

This article breaks down how JavaScript moved from a simple scripting language to becoming the backbone of modern development ecosystems.

Categories
Blog Learning Tech

The Rise of AI Tools and Why Humans Still Matter: Navigating the Digital Revolution in 2025

Introduction

Artificial Intelligence (AI) is no longer a futuristic concept — it’s part of our everyday life. From writing content with ChatGPT to designing visuals in Canva, automating workflows with Zapier, or managing projects in Notion, AI-driven tools are shaping how we think, work, and create.

But as these tools rise in popularity, a quiet resistance continues. Many people and businesses still prefer traditional methods — relying on human intuition, personal experience, and manual control. The question is: Are we becoming too dependent on AI, or are we learning to coexist with it?


The Surge of AI Tools in 2025

The past few years have seen an explosion of AI-based platforms that simplify tasks, boost productivity, and save time.

Some of the most used AI tools today include:

  • ChatGPT & Gemini – AI assistants that write, code, and brainstorm ideas in seconds.
  • Canva & Adobe Firefly – Design tools with AI-generated templates and smart editing.
  • Notion & NotebookLM – Knowledge management systems that understand your content and summarize key insights.
  • Zapier & n8n – Workflow automation tools that connect hundreds of apps without coding.
  • Synthesia – AI video creation with lifelike avatars and multi-language support.

These tools have made digital work faster, cheaper, and more accessible than ever before. Yet, not everyone is rushing to adopt them.


Why Some People Still Avoid AI Tools

Despite the hype, there’s a strong segment of professionals, creators, and everyday users who remain skeptical of AI-powered platforms.

Here’s why:

1. Trust and Accuracy Concerns

AI can produce impressive results, but it can also make subtle mistakes or “hallucinate” facts. For sensitive work — such as legal, financial, or medical — many still prefer human oversight.

2. Comfort and Familiarity

Tools like Google Search, Excel, and even handwritten notes continue to thrive because they’re reliable and easy to control. Humans naturally trust what they’ve used for years.

3. Data Privacy Fears

Sharing data with cloud-based AI platforms raises questions about who owns the content and how securely it’s stored.

4. Creative Authenticity

Writers, artists, and designers often feel that AI-generated content lacks emotion or originality. Many prefer to use AI as inspiration, not as a full replacement.


The Human–AI Balance: Coexisting, Not Competing

The smartest professionals aren’t rejecting AI — they’re mastering how to work alongside it.

Here’s how people are finding balance:

  • AI for Repetition, Humans for Emotion
    Use AI for repetitive or data-heavy tasks while keeping creative storytelling, empathy, and emotional intelligence human-led.
  • Human Review in Every Workflow
    Always review AI outputs — from articles to analytics — to ensure accuracy and alignment with your goals.
  • Learning AI Literacy
    Understanding how AI works, its biases, and its limitations helps professionals use it more responsibly.

What the Future Looks Like

By 2030, the AI landscape will evolve even further. Expect:

  • Personal AI Assistants integrated into phones, browsers, and even home devices.
  • AI-driven jobs where humans supervise, refine, and creatively guide automated systems.
  • Ethical AI frameworks ensuring data transparency and fair usage.

But even in that future, human decision-making, empathy, and originality will remain irreplaceable.


Conclusion

AI is here to stay — but so are humans.
The key is not choosing one over the other but learning how to use both effectively.

AI can boost efficiency, simplify your workload, and open new creative doors. But human judgment, emotion, and authenticity will always define the difference between what’s simply generated and what truly connects.

So, as you explore new tools, remember: the smartest move isn’t automation alone — it’s intelligent collaboration between human and machine.

Categories
Blog Learning Tech

Latest GST Invoicing & Compliance for B2B and B2C in India (2025 Updates)

India’s GST system continues to evolve, bringing in new invoicing and compliance requirements for businesses. Whether you deal with Business-to-Business (B2B) or Business-to-Consumer (B2C) transactions, staying updated is essential to avoid penalties and ensure smooth operations.

This post covers everything you need to know about GST billing, invoicing, and filing under the latest rules effective from May 2025 — with facts, practical tips, and official references.


Understanding GST Invoicing: B2B vs. B2C

B2B Invoices: Mandatory E-Invoicing and Detailed Reporting

If your business has an annual turnover exceeding ₹5 crore, you are required to generate e-invoices for all B2B transactions. This means:

Uploading your invoice data to the Government’s Invoice Registration Portal (IRP).

Receiving an Invoice Reference Number (IRN) and QR code for each invoice.

Including important details such as buyer GSTIN, HSN codes (first 4 digits for large businesses), invoice number, taxable value, and tax amount.

This system ensures real-time invoice validation and enhances transparency across the GST network.
Fact: E-invoicing for B2B is mandatory for turnover > ₹5 crore since January 2023. (Sovos.com)

Also, only invoices properly reported and uploaded by the supplier allow buyers to claim Input Tax Credit (ITC).


B2C Invoices: Consolidated and Detailed Reporting

B2C transactions are treated differently based on invoice value:

For invoices up to ₹1 lakh, businesses report consolidated details in GSTR-1 returns (taxable value and tax amounts).

For invoices above ₹1 lakh, detailed invoice-wise reporting is mandatory.

Dynamic QR codes are required on B2C invoices from September 2024 onward, facilitating digital payments and improving transparency.

Businesses with turnover up to ₹5 crore must report only the first two digits of HSN codes on invoices.


GSTR-1 Return Filing Changes from May 2025

A significant update is the bifurcation of Table 12 in GSTR-1:

Table 12A: For B2B transactions.

Table 12B: For B2C transactions.

Both tables require HSN-wise summaries of supplies, helping the tax authorities analyze sales data more granularly and reducing reconciliation errors.

Timely filing of GSTR-1 remains crucial. Late or incorrect filing can delay ITC claims for buyers, which impacts cash flow and compliance.


Workflow for GST Compliance

  1. Invoice Generation:

E-invoices for B2B transactions through IRP.

Standard invoices with QR codes for B2C transactions.

  1. GSTR-1 Filing:

Report invoices accurately under the correct category (B2B or B2C).

Ensure inclusion of all mandatory details — GSTIN, HSN codes, invoice values, tax rates, etc.

  1. GSTR-3B Filing:

Cross-verify GSTR-1 data and declare tax liability.

Ensure ITC claims are supported by supplier invoice uploads.

  1. E-Way Bill Generation:

Mandatory for inter-state movement of goods exceeding ₹50,000 in value.


Key Compliance Checklist

Ensure accuracy of invoice data (GSTIN, HSN, tax rates).

Comply with e-invoicing mandates based on turnover.

Include dynamic QR codes on B2C invoices.

File GSTR-1 and GSTR-3B on time to avoid penalties.

Regularly reconcile returns to claim correct ITC.


Pro Tips to Stay Ahead

Use GST-compliant invoicing software that automatically generates e-invoices and helps with return filing.

Stay updated with notifications from the GST Council and the Government portal.

Periodically audit your GST returns for consistency between invoices and filings.


Conclusion

The GST landscape in India is advancing towards greater digitization and transparency, especially with the rise of e-invoicing and detailed return filings. Understanding the differences in billing requirements for B2B and B2C transactions — along with the new GSTR-1 structures — is critical for businesses to remain compliant and optimize their tax workflows.


References & Further Reading:

GST E-invoicing Mandate – Sovos

GST Return Filing Changes May 2025 – CaptainBiz

GST B2B vs B2C Invoice Reporting – EZTax

GST Updates – Economic Times

Categories
Javascript Learning Learning Tech

Building & Publishing a Cross-Framework React Hook — 📝react-usedrafty

Prevent accidental form data loss and enhance user experience — one small, powerful hook at a time.

Introduction

In this article, we’ll walk through the journey of creating, enhancing, testing, and publishing a universally compatible React hook for saving form drafts in the browser: react-usedrafty.

Our goal was to:

  • Build a plug-and-play solution for auto-saving and restoring form state.
  • Make it framework-agnostic, working with React, Next.js, and React Router projects.
  • Keep it lightweight with zero dependencies.
  • Add real-world features like route-change warnings and customizable leave prompts.

Step 1 — Hook Requirements

From the initial idea, these requirements were set:

  • Auto-save form data to localStorage or sessionStorage.
  • Restore data on page reload.
  • Warn the user before leaving if there are unsaved changes.
  • Support Next.js and React Router route change detection.
  • Provide clean API and TypeScript types.

Step 2 — Core Hook Implementation

We built the useDrafty hook in TypeScript, then configured the build to export both ESM and CJS formats for maximum compatibility.

Key features in the core:

  • Storage type selection (local / session).
  • Debounce saving.
  • Restore on mount.
  • Dirty-state detection.
  • Configurable warnOnLeave with custom messages.
  • Route change prevention via injected router instance.

Example API usage:

tsxCopyEdituseDrafty("contact-form", formState, setFormState, {
  storage: "local",
  delay: 1000,
  warnOnUnload: true,
  unloadMessage: "You have unsaved changes!",
  router: nextRouterOrReactRouter,
  onRestore: (data) => console.log("Draft restored:", data)
});

Step 3 — Adding Router Awareness

We avoided hard dependencies on Next.js or React Router by letting the user pass their router object.

Internally:

  • For Next.js, we hook into router.events.on("routeChangeStart", cb).
  • For React Router, we watch location changes.

This way:

  • No extra packages are required.
  • The hook works without any router if that feature is not needed.

Step 4 — Packaging for the World

We ensured compatibility by:

  • Targeting ESNext but compiling to both ESM & CJS.
  • Generating .d.ts files for TypeScript users.
  • Writing a package.json with proper "exports" mapping.

Example "exports":

jsonCopyEdit"exports": {
  ".": {
    "import": "./dist/index.mjs",
    "require": "./dist/index.js",
    "types": "./dist/index.d.ts"
  }
}

We also configured:

  • npm run build → Generates ESM, CJS, DTS.
  • .npmignore → Excludes /example from the package.

Step 5 — Local Testing

We:

  • Added an /example folder using Vite & React for quick testing.
  • Made sure the package works by linking locally via:
bashCopyEditnpm link
npm link react-usedrafty
  • Verified in plain React, Next.js, and React Router apps.

Step 6 — Publishing to npm

Version management steps:

bashCopyEdit# Update version
npm version patch  # or minor/major

# Publish
npm publish --access public

💡 Mistake: If you bump the wrong version, you can revert with:

bashCopyEditnpm version 1.2.2 --no-git-tag-version

Step 7 — Documentation

We created a detailed README including:

  • Feature list.
  • Install instructions.
  • Basic & advanced usage.
  • API reference.
  • Changelog with new features (e.g., warnOnUnload, router support).

Step 8 — What’s New in the Latest Version

From this latest dev cycle, we added:

  • Router-aware leave warnings (Next.js + React Router).
  • Custom restore callback onRestore.
  • Universal build that works across major JS environments.
  • Debounce control for save frequency.
  • Clear API for dirty-state detection (isDirty flag).

Conclusion

By following this process, we built a hook that:

  • Works in React, Next.js, CRA, and other environments.
  • Handles both browser unload and in-app route changes.
  • Ships with full TypeScript types.
  • Has local examples for quick testing.
  • Is ready for npm publication with a clean API and docs.

This approach can be applied to any React utility you want to share with the community while keeping it framework-flexible.


Made with ❤️& Fire in heart
PRs and feedback welcome!

Categories
Learning Learning Tech

nextjs/any project have .env and .env.local so when run dev, will it auto pick .env.local or a need to configure something ?

Here is the direct solution if you have question something running in your back of your mind!

Next.js will automatically prioritize .env.local over .env.

more insightful below continue …

📚 Load order (by default):

Next.js loads env files in the following order depending on the mode (dev, build, start):

1. Development (next dev)

  • .env.development.local
  • .env.local
  • .env.development
  • .env

2. Production (next build)

  • .env.production.local
  • .env.local
  • .env.production
  • .env

⚠️ Only variables prefixed with NEXT_PUBLIC_ will be available in the browser.

🔧 No extra configuration needed

So you do NOT need to configure anything manually. It will:

  • Automatically load .env.local if it exists.
  • Fall back to .env for any variables not defined in .env.local.

✅ Best Practice:

  • Use .env for shared/default values (committed).
  • Use .env.local for machine-specific/secrets (not committed to Git).

Happy Reading, Happy learning. Bookmark Now Comeback again!

Thanks for here.

Categories
App Tech

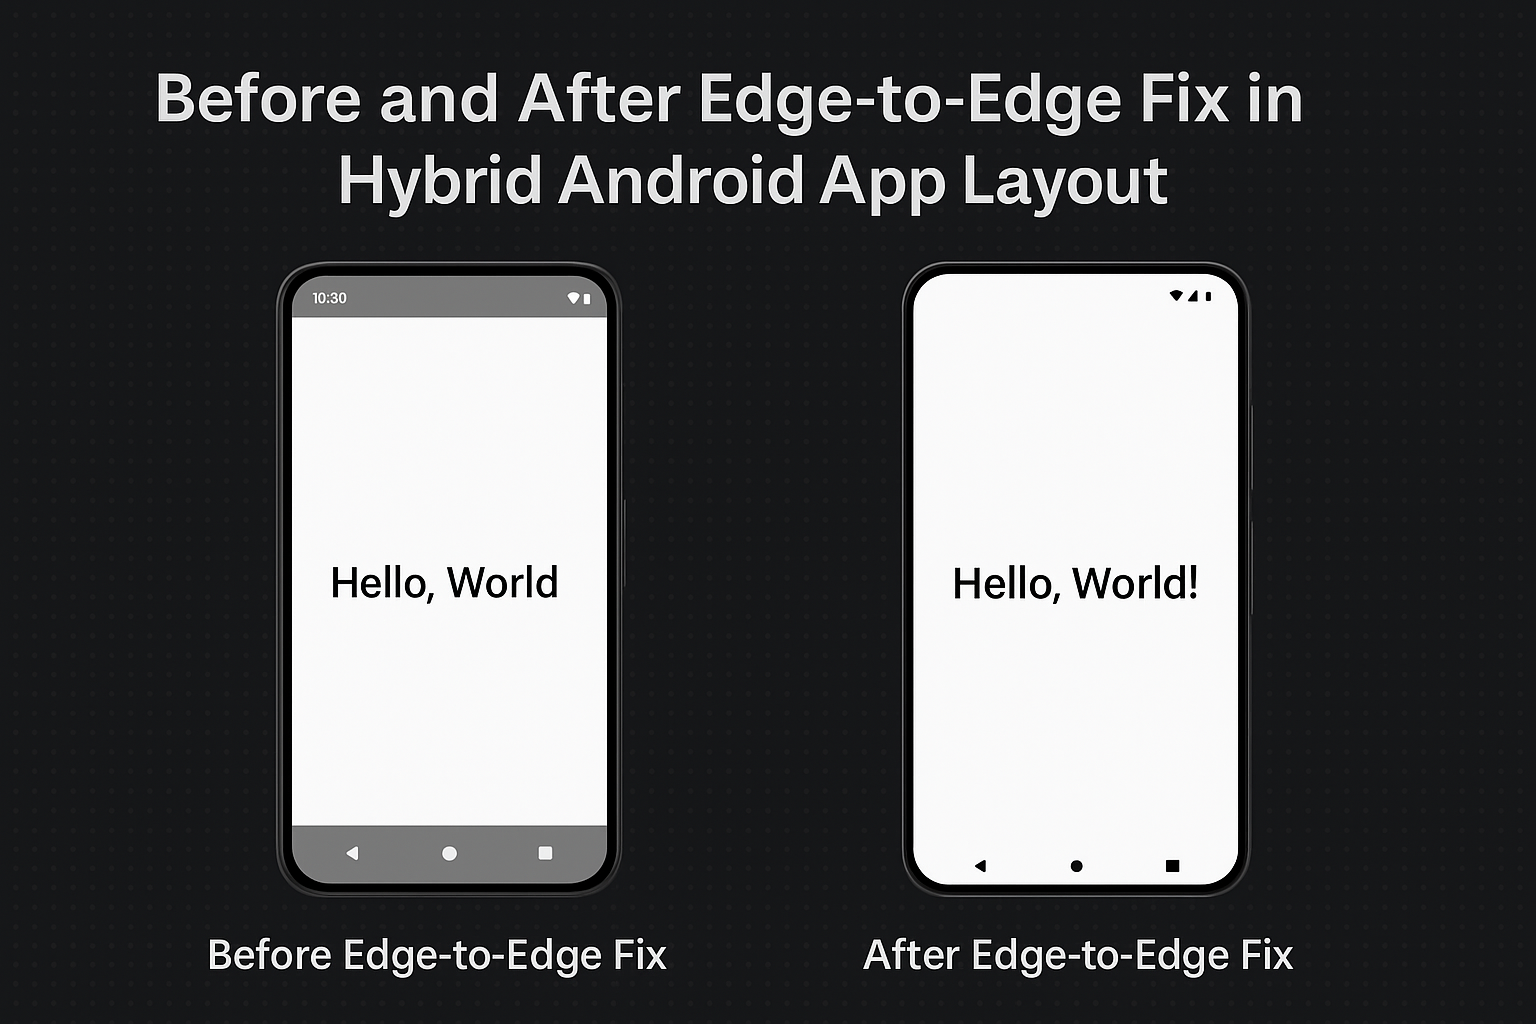
Fixing Edge-to-Edge Issues in Hybrid Android Apps (Android 15+)

Author: Jat

If you’ve updated your hybrid app to target Android 15 (API 34) and noticed broken layouts, cut-off content, or overlapping UI — you’re not alone.

Android is evolving to embrace immersive, edge-to-edge design. But hybrid apps built using Capacitor, Cordova, or Ionic often break because they rely on WebView, which doesn’t automatically adapt to system gesture insets or modern screen shapes.

🌐 What is Edge-to-Edge UI?

Edge-to-edge layout means your app’s content extends beneath the status bar, navigation bar, and gesture areas — using every available pixel.

Android encourages this layout to support:

  • Immersive design on full-screen devices
  • Compatibility with gesture navigation
  • Maximum space usage on notch, punch-hole, and curved displays

Read the official Android Edge-to-Edge Design Guide.

🎯 Why Was It Introduced?

  1. Maximize screen real estate — avoid wasting space on top/bottom bars.
  2. Gesture navigation compatibility — gestures now replace buttons.
  3. Modern UX standards — aligned with Google’s Material You design language.
  4. Cross-device consistency — Pixel, Samsung, OnePlus now follow Android’s rules.

💥 Why Hybrid Apps Break

Hybrid apps rely on WebView, which doesn’t adapt automatically to insets. The result?

  • Content may get hidden behind the system UI
  • Safe areas are ignored unless manually defined
  • CSS-only solutions fail unless the native layer is configured correctly

🛠 How to Fix Edge-to-Edge in Hybrid Apps

✅ 1. Set Target SDK to 34

compileSdkVersion 34
targetSdkVersion 34

✅ 2. Update Native Code for Insets

In MainActivity.java or MainActivity.kt:Java:

if (Build.VERSION.SDK_INT >= Build.VERSION_CODES.R) {
  getWindow().setDecorFitsSystemWindows(false);
} else {
  getWindow().getDecorView().setSystemUiVisibility(
    View.SYSTEM_UI_FLAG_LAYOUT_STABLE |
    View.SYSTEM_UI_FLAG_LAYOUT_FULLSCREEN |
    View.SYSTEM_UI_FLAG_LAYOUT_HIDE_NAVIGATION
  );
}

Kotlin:

if (Build.VERSION.SDK_INT >= Build.VERSION_CODES.R) {
  window.setDecorFitsSystemWindows(false)
} else {
  window.decorView.systemUiVisibility = (
    View.SYSTEM_UI_FLAG_LAYOUT_STABLE or
    View.SYSTEM_UI_FLAG_LAYOUT_FULLSCREEN or
    View.SYSTEM_UI_FLAG_LAYOUT_HIDE_NAVIGATION
  )
}

✅ 3. Make System Bars Transparent

In styles.xml:

<item name="android:statusBarColor">@android:color/transparent</item>
<item name="android:navigationBarColor">@android:color/transparent</item>

✅ 4. Handle Safe Areas in CSS

html, body {
  padding-top: env(safe-area-inset-top);
  padding-bottom: env(safe-area-inset-bottom);
  padding-left: env(safe-area-inset-left);
  padding-right: env(safe-area-inset-right);
}

For Ionic:

:root {
  --ion-safe-area-top: env(safe-area-inset-top);
  --ion-safe-area-bottom: env(safe-area-inset-bottom);
}

✅ 5. Respect Gesture Areas

Don’t place buttons or toolbars flush against screen edges. Use padding or bottom spacing to avoid gesture interference.

🧪 Debug Tip

Use Android Studio Layout Inspector or this ADB command to inspect insets:

adb shell dumpsys window | grep -i inset

🔗 External Resources

✅ Conclusion

Edge-to-edge layout isn’t just a design trend — it’s a requirement. Android 15 pushes for immersive, gesture-friendly apps. While hybrid apps need extra configuration, the result is a modern, polished experience that feels native.

By combining native insets with smart CSS, your hybrid app can look and behave like a top-tier Android experience — ready for the future.


Happy learnings!

Categories
Blog Learning Tech

🧠 Can You Build a Hybrid App Using Python and MongoDB on Shared Hosting? (Modern Dev Stack Insights – 2025)

❓ User Question:

“I am on a shared host using cPanel. Can I develop a hybrid application using Python and MongoDB? Or what is the recommended database and coding language?”

✅ Expert Answer:

If you’re on a shared hosting plan with cPanel, there are certain limitations that will shape what kind of stack you can use — especially for hybrid applications (like mobile/web apps built using React Native, Capacitor, or Flutter Web).

⚙️ Can You Use Python & MongoDB on Shared Hosting?

✅ Python Support (Limited)

  • Most shared hosts offer limited Python support, often via CGI or Passenger.
  • Long-running apps like Flask or FastAPI may not be supported unless your host offers it specifically (some do via Passenger or SSH access).

❌ MongoDB Support (Nope)

  • MongoDB is not supported on most shared hosting plans.
  • Shared hosting is built around MySQL or MariaDB, and does not allow custom server processes like MongoDB.
  • You can use MongoDB Atlas as a cloud database, but you’d still need a proper backend server to connect to it.

✅ So What Stack is Recommended on Shared Hosting?

Tech LayerRecommended on Shared Hosting
FrontendReact (static build), HTML/CSS/JS
BackendPHP (Laravel or Vanilla), maybe Python if supported
DatabaseMySQL or MariaDB
Hybrid App APIBuild REST API in PHP or limited Python
HostingUse cPanel to manage files, cron jobs, and MySQL

Conclusion: Use PHP + MySQL for backend API if you’re sticking to shared hosting.


🌍 What’s the Recommended Dev Stack in 2025?

If you’re not restricted to shared hosting and want a future-ready stack for professional, scalable development, here’s what we recommend:


🔧 Frontend

  • Next.js (React) + Tailwind CSS + TypeScript
  • Alternatives: SvelteKit, Vite + React, Astro
  • For mobile: React Native, Expo, Capacitor (hybrid app framework)

⚙️ Backend

  • Node.js + Express / Fastify
  • NestJS (if you prefer structure and TypeScript)
  • Python (FastAPI) – Best for data-heavy apps or AI
  • Laravel (PHP) – Rapid development for traditional apps
  • Go or Rust – For performance-heavy systems

🗃️ Database

TypeRecommended
RelationalPostgreSQL (modern), MySQL
NoSQLMongoDB Atlas (external), Firestore (for real-time), Redis (cache)

🚀 Hosting & Deployment Options

PlatformUse Case
VercelBest for frontend (Next.js)
Render / RailwayFull-stack hosting with DB
Firebase / SupabaseAll-in-one backend, auth, DB
DigitalOcean / Hetzner VPSFull control + Docker setup
MongoDB AtlasFully-managed MongoDB, free tier available

📌 Summary

GoalRecommended Action
Use Python + MongoDB on shared hosting❌ Not feasible
Stick to shared hosting✅ Use PHP + MySQL
Want modern, scalable stack✅ Use Node.js, Python, or Laravel + cloud DB
Build hybrid mobile app✅ Backend API (Node/PHP) + React Native or Capacitor

✨ Final Thought

If you’re starting small, shared hosting is a great launch pad. But for serious hybrid or full-stack app development in 2025, modern cloud platforms offer better flexibility, tooling, and scalability.


🧠 Need Help Choosing the Right Stack?

Comment below or contact us — we can help you decide the best stack based on your goals, skill level, and resources.

📌 Tags:

Categories
Ask AI Tool Tech

5 AI Tools That Actually Save You Time (And Aren’t Scary)

AI tools

Let’s be real—AI sounds like either a robot apocalypse or something only tech nerds care about. But the truth? There are actually useful AI tools that save time, boost productivity, and make life easier—without feeling like you’re talking to Skynet.

Here are five that even your grandma (or your group chat) could get into:


⚡ 1. ChatGPT – Your Brain’s Backup

Need to write an email, brainstorm a birthday message, or summarize a meeting? Just type a prompt and it does the thinking with you. It’s like a helpful coworker who never sleeps (or eats your snacks).

💡 Try: “Summarize this 10-page doc in 3 bullet points.”


✍️ 2. Grammarly – Your Writing Wingman

Whether you’re sending a professional email or updating your LinkedIn, Grammarly catches typos, fixes grammar, and even helps you sound smarter (and nicer).

💡 Bonus: It works across Chrome, Gmail, and Google Docs. Magic.


📅 3. Motion – The Calendar That Plans for You

Motion combines your to-dos and meetings and automatically schedules your day. It shifts things when new tasks come in—perfect for busy bees who hate time-blocking.

🧠 Like Google Calendar… but with a brain.


🎨 4. Canva Magic Studio – Design Without a Designer

Want a logo, a social post, or a clean presentation? Canva’s AI can now generate visuals, layouts, and even write captions. No design degree required.

🎯 Good for: Solopreneurs, students, content creators.


🔊 5. ElevenLabs or Descript – Turn Text into Voice (or Vice Versa)

Create voiceovers, transcribe podcasts, or edit audio like you’re cutting a Word doc. These tools are surprisingly accurate and oddly fun.

🎙️ Imagine changing a sentence in your video by just typing it.


✅ Final Thought

AI isn’t here to steal your job. It’s here to handle the boring parts so you can focus on the cool stuff. You don’t need to be a tech genius—just curious enough to give it a shot.

Try one. You might just buy yourself back an hour a day.

Categories
Ask AI Tool Tech

Understanding How ChatGPT Works (ML/AI learning path)

Goal: Understand transformers, large language models, and the architecture behind ChatGPT.

Tutorial Suggestions: