Look for “MultiPHP Manager” in Cpanel search bar or on home page of your Cpanel after login.
Reference screenshot
It will show you your current System PHP version and below option to change the setting for PHP version as required.
From dropdown menu like on right select the version of PHP you needed and apply, before that not to forget to select the list of domains, if you have multiple websites or subdomains to apply the latest PHP version.
Hope this solves your issue to the fastest when composer dependencies gives error like below when you trying to test small issue of your website.
I was facing this issue on the subdomain site, were subdomain accessing the assets from parent site domain.abc from folder structure pattern path of image file.
Was getting 404 error for loading image… (why I am explaining all over this, lets come to point of fixing 🙂 )
To note I was doing this under my Cpanel Shared Hosting Server.
In my root folder (mdw) of assets for example mdw/assets/images/ created .htaccess files and added following lines of code:
and the image started loading fine, CORS issue resolved.
Just in regex above replace with the exact domain name of parent it will fix the CORS issue of the question.
Beside, if you don’t have access to shared host or cpanel, then try to install browser CORS plugin and enable it to load the resources by bypassing this CORS issue, in same case it still won’t work you would need request your team or superior to get it resolved for you 🙂
Okay well, this error occurred when you try to send the generated buffer data as an attachment using @sendgrid/mail service.
To tackle issue, will simply paste the previous line of code and the fix line of code so data was then send as base64 content as required with the @sendgrid/mail service
res.send(response); //previous line of response from nextjs api
after adding the fix over same above line using Buffer
res.send(Buffer.from(response).toString('base64')); // to base64 string as an output resolve the above issue
If anyone wants to look for the entire piece of file code, here you go:
// import the necessary node libraries
const chromium = require('chrome-aws-lambda');
const puppeteer = require('puppeteer');
import { createEmailTemplate } from "../../api/functions/index";
// var Buffer = require('buffer/').Buffer  // note: the trailing slash is important!

export default async (req, res) => {

    // console.log({ m: req.method.toLowerCase(), body: Object.keys(req.body).length });

    if (req.method.toLowerCase() !== 'post' ||
        (!Object.keys(req.body).length ||
            process.env.YOUR_EXTERNAL_API_SECRET !== req.body.your_api_secret)) {
        res.status(403).send("Access denied");
        return;
    }

    const { generateType, store } = req.body; // && JSON.parse(JSON.streq.body);
    const templatePayload = {
        ...req.body,
        assetsBaseURL: process.env.NEXT_PUBLIC_ASSETS_BASE_URL,
        siteName: process.env.SITE_NAME,
        logoPath: store?.logo,
    };
    // console.log({ templatePayload });
    try {

        // compile the file with handlebars and inject the customerName variable
        const html = createEmailTemplate("my-invoice", templatePayload);

        // simulate a chrome browser with puppeteer and navigate to a new page
        const browser = await puppeteer.launch({
            args: chromium.args,
            // defaultViewport: chromium.defaultViewport,
            // defaultViewport: generateType && generateType === 'pdf' ? chromium.defaultViewport : { width: 640, height: 1200 }, //chromium.defaultViewport,
            executablePath: await chromium.executablePath,
            headless: generateType && generateType === 'pdf' ? true : chromium.headless,
            ignoreHTTPSErrors: true,
        });

        const page = await browser.newPage();
        await page.setViewport({
            width: 640,
            height: page.viewport().height, // + 400,
            deviceScaleFactor: 1,
        });

        // set our compiled html template as the pages content
        // then waitUntil the network is idle to make sure the content has been loaded
        await page.setContent(html, { waitUntil: 'networkidle0' });

        // convert the page to pdf with the .pdf() method
        let response;
        if (generateType && generateType === 'pdf') {
            const pdf = await page.pdf({ format: 'A4' });
            response = pdf;
        } else {
            const screenshot = await page.screenshot({ fullPage: true });
            response = screenshot;
        }
        await browser.close();

        // // send the result to the client
        res.statusCode = 200;
        res.send(Buffer.from(response).toString('base64'));

        // CODE BELOW WRITE RESPONSE AS HTML AND IMAGE IS DISPLAYED, TESTTED
        // res.writeHead(200, { 'Content-Type': 'text/html' });
        // res.write('<html><body><img src="data:image/jpeg;base64,')
        // res.write(Buffer.from(response).toString('base64'));
        // res.end('"/></body></html>');

    } catch (err) {
        console.log(err);
        res.status(500).json({ message: err.message });
    }
};
I hope this find useful to anyone who facing this question or challenge.
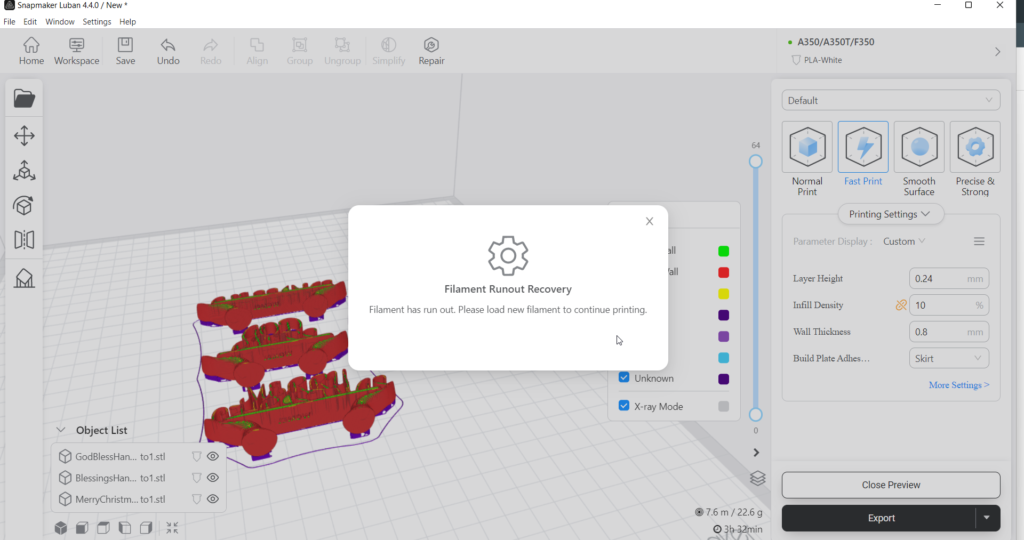
which could solve the issue of the error message of Filament runout.
Incase that’s not your case, then you need to pull out the jammed filament in the filament passer to the nozzle.
Here is the quick answer in the video how to get that jammed filament out more easily and what not required to do (so). Please follow the video how exactly it got fixed for the me for the stuck filament not coming out.
Fix filament stuck issue in Snapmaker 3D Module #snapmaker @3dmodule #filament
After removing the stuck filament, I was still getting filament runout error, I was sure I have missed the steps of tightening the filament runout sensor in the module, so I have used following command line code to skip the check of Filament Runout Error and proceed with the new 3D Prints:
To Disabled Filament Runout check, type code in Command Line Interface in Luban Software: M412 S0
To enable Filament Runout check, type code in Command Line Interface in Luban Software: M412 S1
Hope this solves your issue and happy 3D printing.
They provide 3D Printing, Laser Engraving and Laser Cutting on various materials like paper, wood, fabric, plastic, leather, rubber, ceramic, glass. CNC work for small or medium size art or designs.
Multidimwork having a best industry all in one 3D Printer, Laser Engraving and Cutting, CNC machine, available in your nearby area or city.
Machine work area as follow:
3D Printing (W × D × H)320 × 350 × 330 mm
Laser Engraving & Cutting (W × D)
320 × 350 mm
CNC Carving (W × D × H)
320 × 350 × 275 mm
For any inquiries you can write them at mdw@doableyo.com and best to follow them on Instagram : @multidimwork for recent work’s!
Filtering customers state array based on array of ids in javascscript/react.
const activeCustomerIdSet = [3,4,9];

//customers is array of customer data in my case its array value is bit different, just to note.

const filteredActiveCustomersIds = Array.from(activeCustomerIdSet) || [];
            let nonActiveCustomers = [];
            let filterCustomer = [...customers];
            if (filteredActiveCustomersIds.length) {
                for (let cid of filteredActiveCustomersIds) {
                    filterCustomer = filterCustomer?.filter(cust => {
                        if (+cust?.value?.id !== cid) {

                            return cust;
                        }
                    });
                }
                nonActiveCustomers = [...nonActiveCustomers,
                    filterCustomer];
            }

            console.log({  filteredActiveCustomersIds, customers, nonActiveCustomers });
from the below video post/reel, Bhai ji explaining when one will face danger and why one not if he his real Spritual Guru or motivational speaker.
Because, when one will not face danger or faced danger, he will have not touch the real issues of India who all have holding the India from within by using masked face of religion, politicians and what not.
Here I would like to share with you a very handy and new innovative approach using ES6 Tag Literals template to ease of creating the base URL’s for use a single source of truth defined as library constants or utility code to refer as the single page application grows.
Let’s get hand dirty and mind free from hassle of maintaining and forming lines cluttered code and creating mess in many files as web application grows.
Hope you understand what I mean, developers get frustrated to follow the best practice as in tight project deadlines,
Heads up on I am currently using 2Factor.in endpoints in this post as I were using part of the project implementation, we will head in list out numbers as steps needs to follow for the quick implementation:
We will save API key and API base URL in env file, (hope you are aware were it will lies in your project code, basically it lies at the core level of project director with named and with extension exactly, .env
3. Next we need to import publicRuntimeConfig object in our constants(.js) file
import { publicRuntimeConfig } from "./env.settings";
I am importing from .env.settings files which is actually using nextjs getConfig method to export publicRuntimeConfig variable, I am skipping that step to show here, once you search for docs on next/config you will get an idea what we are doing here.
4. Main part here it comes in contants.js file:
export const f2param1 = (param) => param || 1234657890;
export const f2param2 = (param) => param || "myTemplateName-OTP";

export function tagTemplate2FactorAPI(strings, param1, param2) {

  const { SITE_2FACTORIN_API_BASE_URL, SITE_2FACTORIN_API_KEY } = publicRuntimeConfig;
  const prefixBaseUrl = SITE_2FACTORIN_API_BASE_URL + SITE_2FACTORIN_API_KEY + '/';

  let str0 = strings[0] || ""; // "That "
  let str1 = strings[1] || ""; // " is a "
  let str2 = strings[2] || ""; // "."

  // We can even return a string built using a template literal
  return `${prefixBaseUrl}${str0}${param1 || ''}${str1}${param2 || ''}${str2}`;
}

export const factor2API_Endpoint = {
  CHECK_OTP_SMS_BALANCE: `BAL/SMS`,
  SEND_OTP_SMS: tagTemplate2FactorAPI`SMS/${f2param1()}/AUTOGEN`,
  SEND_OTP_SMS_TEMPLATE: tagTemplate2FactorAPI`SMS/${f2param1()}/AUTOGEN/${f2param2()}`,
  SEND_VERIFY_SMS: tagTemplate2FactorAPI`SMS/VERIFY/${f2param1()}/${f2param2()}`,
  CHECK_TRANS_SMS_BALANCE: `/ADDON_SERVICES/BAL/TRANSACTIONAL_SMS`,
  SEND_TRANS_SMS: `/ADDON_SERVICES/SEND/TSMS`,
  SEND_TRANS_SMS_DYNAMIC_TEMPLATE: `/ADDON_SERVICES/SEND/TSMS`,
};

console.log(factor2API_Endpoint.SEND_OTP_SMS);
console.log(factor2API_Endpoint.SEND_OTP_SMS_TEMPLATE);
console.log(factor2API_Endpoint.SEND_VERIFY_SMS);
This is how the final code looks, but there is a catch in this code, just need to handle of passing the params dynamically to the constants property of the object, otherwise with the fixed 2 params in same file would do the trick.
Will share once I got the way of passing dynamic params values to object property in template literal invocation line.
—— Here I found it the other approach —- Edited: 00:44 (after few mins of publishing this post after above approach shared 🙂 )
export function tagTemplate2FactorAPI(strings, ...keys) {

  const { SITE_2FACTORIN_API_BASE_URL, SITE_2FACTORIN_API_KEY } = publicRuntimeConfig;
  const prefixBaseUrl = SITE_2FACTORIN_API_BASE_URL + SITE_2FACTORIN_API_KEY + '/';

  return (function (...values) {
    let dict = values[values.length - 1] || {};
    let result = [strings[0]];
    keys.forEach(function (key, i) {
      let value = Number.isInteger(key) ? values[key] : dict[key];
      result.push(value, strings[i + 1]);
    });

    result.unshift(prefixBaseUrl); //added this line to prefix with base url path
    return result.join('');
  });
}

export const factor2API_Endpoint = {
  CHECK_OTP_SMS_BALANCE: `BAL/SMS`,
  SEND_OTP_SMS: tagTemplate2FactorAPI`SMS/${0}/AUTOGEN`,
  SEND_OTP_SMS_TEMPLATE: tagTemplate2FactorAPI`SMS/${0}/AUTOGEN/${1}`,
  SEND_VERIFY_SMS: tagTemplate2FactorAPI`SMS/VERIFY/${0}/${1}`,
  CHECK_TRANS_SMS_BALANCE: `/ADDON_SERVICES/BAL/TRANSACTIONAL_SMS`,
  SEND_TRANS_SMS: `/ADDON_SERVICES/SEND/TSMS`,
  SEND_TRANS_SMS_DYNAMIC_TEMPLATE: `/ADDON_SERVICES/SEND/TSMS`,
};

 console.log(factor2API_Endpoint.SEND_OTP_SMS(12311312, 'newTemplate-newOTP'));
 console.log(factor2API_Endpoint.SEND_OTP_SMS_TEMPLATE(5656565, 'newTemplate-newOTP'));
 console.log(factor2API_Endpoint.SEND_VERIFY_SMS(456646545, 'newTemplate-newOTP'));
Here is the quick solution I found and worked for me, hope it helps you too in some scenario we might mistaking
Pitcure (a)
As in the (a) was getting null as a data response in the react child component (where the text shown “Reset linked expired…”) , where actually data was updating from parent component and passed to react child component named <ResetPasswordForm … /> as ‘data’ as a prop, here its full code look like:
Solution 1 : To fix the issue of null, I have to remove the wrapping GlobalCookieContextProvider component as I was not passing any prop to it and also I have no use in this Reset Password Main component, so after removing the wrapping Provider component it worked like as expected, Boom!.
Results of JSON output attached to the form
Picture (b)
Hence start receiving data from parent react component when state change updated dynamically from URL query params as expected.
But wait, Solution 1, was not working still as expected in certain refreshes, then work around did and moved the all query params check code from nextjs page component to its child level component named ResetPasswordForm component and everything finally working as expected again.
Hope you enjoyed the post, let me know in comments if confused you, will try to re-try to post again.
Happy we learning!
Conclusion
First found the wrapping un-used React Provider component, causing a stop of re-ending of react child component when parent component state update done, but after some further testing its was still breaking, final solution found in moving the router query params check and updating state into the first level child component itself which does the expected checks in useEffect() and render the component fairly with the expected results on query fetch done.